In this blog post I will show how to use a “button” to “move” an item from one list to another using JSON column formatting. The Create a button to launch a Flow for the selected item JSON code was developed Chris Kent and I have used it to great effect when manual archiving items was required. I am using two copies of the Microsoft Lists Issue Tracker template for my examples. The source list is call “Issue tracker” and the destination list in called “Issue tracker archive”.

Let’s create a simple Flow that will copy the selected row to the destination list. Create a new Flow by clicking “Automate” > “Power Automate” > “See your flows”.

Click “New” > “Instant-from blank”.

Provide a Flow name, I.e. “Issue tracker – Archive”, select the “For a selected item” trigger and click “Create”.

Set the “Site Address” and “List Name” to your source site and list (Issue tracker).

Click “New step”, search for “SharePoint” and select the “Get item” action.
Set the “Site Address” and “List Name” to your source site and list (Issue tracker).
Set “Id” to “ID” from the “For a selected item” trigger.

Click “New step”, search for “SharePoint” and select the “Create item” action.
Set the “Site Address” and “List Name” to your destination site and list (Issue tracker archive). Set all other fields to the matching fields from the “Get item” action.

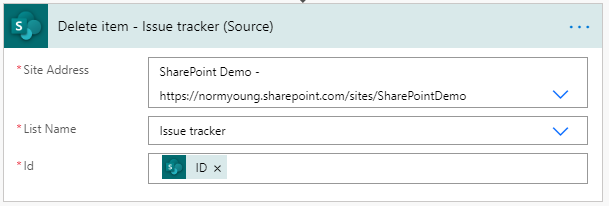
Click “New step”, search for “SharePoint” and select the “Delete item” action.
Set the “Site Address” and “List Name” to your source site and list (Issue tracker).
Set “Id” to “ID” from the “Get item” trigger.
My completed Flow looks like the image below.

Save and test your Flow by going to the source list, select a list item, click “Automate” and then click “Issue tracker – Archive”. Click “Run flow”

If all goes well the selected item will be created in the destination list and deleted from the source list.

Let’s add the “button” to the source list by adding a new “Single line of text” column called “Flow”.

Copy the JSON the code from Github.
Format the “Flow” column by clicking “Column settings” and then “Format this column”.

Click “Advanced mode” and paste in the JSON code.

Replace the highlighted Flow ID with the ID with your newly created Flow.
- Clicking “Automate” > “Power Automate” > “See your flows”.
- Click on the “Issue tracker – Archive” Flow.
- Copy the ID from the end of the URL, between “flows/” and “/details”

Click “Save” to save your changes.
Now for the cool part. Click the “It’s Flow Time!” button on your source list item and if you copied the Flow ID correctly your “archive” item will execute.


I like this pattern for deferring items for later use where a business process object transitions from one state to another (i.e. short term vs long term) and business rules are applied differently between states.
Thanks for reading.
NY

Hey Norm,
Do you know if there Is anyway to use power automate from Microsoft lists in a non default environment?
I can’t seem to get “for a selected record” to work for a JSON button that I made with column formatting
LikeLike
Hi Brad, unfortunately, this is not possible. Only flows within the default environment can be executed manually from a SharePoint list. There is a user voice entry worth voting on –
https://powerusers.microsoft.com/t5/Power-Automate-Ideas/Use-For-a-selected-Sharepoint-item-also-in-non-default/idi-p/685507
Thanks for reading.
NY
LikeLike
This is awesome. Thanks so much! Question – my list items have photos in them and they are not being copied over. Any ideas?
LikeLike
Hi Beth,
The out-of-the-box SharePoint Create item action does not account for images. A Send HTTPS Request would have to be used. Check out this post to see how it can be accomplished: https://normyoung.ca/2020/04/29/build-a-safety-issue-solution-using-sharepoint-and-power-automate-part-2/
I’ll look to do a future blog post on this one.
Thanks for reading!
NY
LikeLike
I’m running into a similar issue with Comments. The Comment column in my source list doesn’t retain the comments in the Archived list. How can I get the comments to archive as well?
LikeLike
Hi Pete,
Comments are a tough one to bring over and require using the SharePoint REST API to perform the extraction. If you want to look into this further you’ll need to Create Graph API Connector for use in your Flow. I wrote about this before https://normyoung.ca/2020/11/27/use-ms-lists-and-power-automate-to-provision-private-channels-in-teams/.
Probably not what you want to hear but that is what is required at this point in time.
Thanks for reading!
NY
LikeLike
Hi Norm, thanks for the post. Quick question – my source list has several columns with multiple selections. Because of this, when I run this flow for a single item in my source list, multiple rows are being created in my destination list, each with a unique combination of variables. I saw your supplemental post Use Power Automate to copy multiple selections from Choice columns between Microsoft Lists, but I’m getting stuck on how to integrate that flow with the one you’ve outlined above. I’m just trying to copy items exactly as they appear in the source list to the destination list (don’t need to delete anything). Is there a way to do everything in a single flow?
LikeLike
Hi Natalie,
Check out this post: https://normyoung.ca/2020/10/30/use-power-automate-to-copy-multiple-selections-from-choice-columns-between-microsoft-lists/
Thanks.
NY
LikeLike
Hi, can you please help, how to move a selected sharepoint list items to a new list along with attachment file.
LikeLike
Hi Pradeep,
Check out this post: https://normyoung.ca/2020/09/12/add-attachments-from-forms-to-microsoft-lists-using-power-automate/. You need to apply a similar approach.
I’ll make this into a future blog post.
Thanks for reading!
NY
LikeLike
Can you move SEVERAL items at once from one list to another one?
LikeLike
Hi Lucas,
No, the “SharePoint For selected item” trigger does not work in that way.
Thanks for reading!
NY
LikeLike
Nice article Norm. Lucas, I’ve done a video demoing how you can select multiple items or documents and trigger a flow on them here https://youtu.be/jKZ-KSMAzrc this might help with your use case.
LikeLike
Thanks Damien!
LikeLike
Hi Norm,
Greatly appreciate the images above but had a clarifying question. Background – I am needing to create a flow that will copy source information and create/add a new row of information from source list to destination list based on a trigger (‘completed’ status), then have the flow delete the copied row of information from source list (to keep the list clear of all completed projects/implementations/etc. Is that possible and if so what would the flow look like? I believe my company has the standard sharepoint package…
LikeLike
Hi Dylan,
This is definitely possible. See this post: https://normyoung.ca/2020/09/24/take-action-based-on-value-in-microsoft-lists-column-using-power-automate/. Instead of sending an email message, copy the row and delete as desired.
I hope that helps.
NY
LikeLike
Hi Norm, Do you have a sollution how to incorporate attachments that should also be copied from one list to the other together wih the list item?
LikeLike
Hi Willem,
No, but I do have the building blocks in other solutions. Let me put together something and get back to you.
Thanks for reading!
NY
LikeLike
Thank you for the detailed instructions. I followed the directions to create the flow, but am unable to Test it from Power Automate. When I try to test it from the Source list, I select an item, but I do not see the newly created flow in the Automate… menu. Is there something else I need to do to tie the flow to the list? Or is there another way to trigger the flow other than from selecting the item? I do not want to use when an item is created, because we only want to use this flow when an item is ready to moved to the new list, as in your example.
LikeLike
Hi RG,
Is the trigger, For a selected item? This trigger is the only way to get the Flow to display in the context of the list.
Thanks for reading!
NY
LikeLike
Yes, that is the trigger I’m using. But it’s still not showing on the List.
Renee Getter // Senior Consultant
720.350.3496 // http://www.bridge.partners
________________________________
LikeLike
Hi Renee,
Odd behaviour. Is your Flow in the default environment? If not that would explain it.
https://docs.microsoft.com/en-us/connectors/sharepointonline/#known-issues-and-limitations
Recreate the Flow in the default environment to confirm.
I hope this helps.
NY
LikeLike
Norm-
Thank you. We have been using the D365 Customer Voice environment but recreating the flow in the default environment did seem to work.
Renee
Renee Getter // Senior Consultant 720.350.3496 // http://www.bridge.partners
LikeLiked by 1 person
Hi Norm ,
I have created a List put Im unable to search for number column , I have used ListItemID in search tab and it is still not working , Looking forward for your help , Thank you
LikeLike
Hello Sunit,
Copying number columns does work with this Flow pattern. The source and destination list column types much align for the Create item action to work as expected.
I hope this helps and thanks for reading!
NY
LikeLike
Hi Norm, Thank you for this, this was exactly what I was looking for. However, when I have Run the Flow. The item is created in the “archive” but doesn’t delete from the “source”. Can you advise where I might be going wrong? Thanks in advance
LikeLike
Hi Julie,
Make sure you are using the “ID” from the “Get item” trigger (aka Source).
Let me know how you make out and thanks for reading!
NY
LikeLike
That’s perfect – all sorted and working beautifully! Thanks so much!
LikeLiked by 1 person
This solution works great for us, however we can click the ‘Flow’ link multiple times and add that list item that many times to the new list. How do you check the receiving list first to determine if the source list ID is already there in order to prevent duplicates?
LikeLike
Hi Alysa,
The source and destination ID’s will never match. You could check for the existence of row in destination using a Get items action and condition to see rows match.
A different approach is to have a choice column in source that indicates that it was copied or not. If not copied then allow the Flow to run.
I hope this helps and thanks for reading!
NY
LikeLike
Hey Norm,
Great way, work just fine, I’ve also learned from your blog how to transfer elements with attachments and here I’ve faced one issue. Attachments were uploaded with delay or were not uploaded at all. How do you think, why it’s like that? maybe something wrong with the permissions (access to flow have 2 person)
LikeLike
Hi Evgeniy,
Attachment size might be an issue. Check the Form for the single file size settings and then test accordingly.
Thanks for reading!
NY
LikeLike
Nice – thank you! It all works as expected – except one thing. After I click the command to archive, I then have to click a button ‘Run Flow’ and then I have to click a command ‘Done’. Is there anyway to make this a one-click solution? I suspect it’s due to some config in the environment rather than being specific to this implementation.
LikeLike
Hi Bryan,
Interesting question. Try adding this JSON column formatting sample – https://github.com/pnp/List-Formatting/tree/master/column-samples/generic-start-flow. I can’t remember if it provides a single click experience.
Thanks for reading!
NY
LikeLike
Hello Norm,
I am trying to follow your tutorial, but my steps don’t look the same as yours. I’m fairly new to this, so I’m not sure if I’m just missing some previous steps.
https://mailvalenciacc-my.sharepoint.com/:i:/g/personal/lkeegan_valenciacollege_edu/EYzp0uUFL3BBtbotOUb1zMoBHfB96NtiI3sFTjKPXZoDuA?e=cB9cIq
https://mailvalenciacc-my.sharepoint.com/:i:/g/personal/lkeegan_valenciacollege_edu/EWHQL0lxZ7xOtosYoyXRqTQBUaVgasL275xpSBtvM7zhwQ?e=acs3EU
LikeLike
Hi Lori Ann,
It looks like you are using the “Get Items” action. Use the “Get Item” action instead.
I hope this helps and thanks for reading!
NY
LikeLike
Hi There,
Any idea where I should troubleshoot when I click the “It’s Flow Time!” link but I just get a “Setting Up…” notice and nothing happens?
Thanks!
Danny
LikeLike
Hi Danny,
Sorry for the delayed response. Are you still getting that error?
Thanks for reading!
NY
LikeLike
Hi Norm, love this flow but it keeps failing on the delete step. While it’s pointed to my source library it’s trying to delete the destination library’s Id for the item. Please help?
LikeLike
Hi Ali,
It can be so easy to use the wrong output from previous steps that use the same action. Be sure to rename your SharePoint actions to include a description that makes sense to you, like “Get items – Source”, “Add item – Destination”, “Delete item – Source”. This way when you select the Id column it will have your description to ensure you are using the right Id output.
Hope this helps and thanks for reading!
NY
LikeLike