Building on the first two entries of this blog series (Part 1, Part 2), we will continue adding functionality to our Power Automate and SharePoint solution. In this post, we will create and customize an approval process for the “admin” of the safety issue solution.
Let’s jump into Power Automate and create a new Flow by click “Automate”, “Power Automate” and then “See you flows”.

Click “New” and then select “Automated – from blank”.
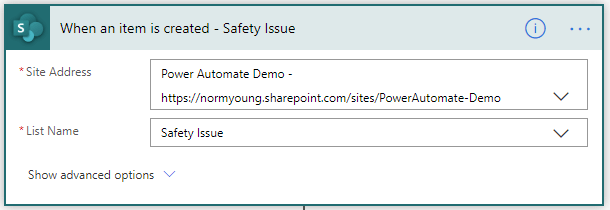
Use the SharePoint “When an item is created” trigger, provide a Flow name i.e. “Safety issue response” and then click “Create”.

Set the trigger to your site and list name.
Add a new step using the SharePoint “Get attachments” action and then:
- This is important, rename the step to “Get attachments – Safety Issue (attachment name)”. Seriously this is important, get renaming.
- Set the step to your site and list name.
- Set “Id” to “ID”.

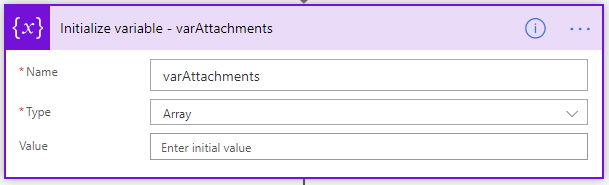
Create a new step using the Variable “Initialize variable” action and then:
- Set “Name” to “varAttachments”.
- Set “Type” to “Array”.
In this next section we will copy the attachment from the new safety issue submission into a variable. The variable will be used in the approval message and will give the admin an idea if the issue is of concern or not. Add a new step using the Control “Apply to each” action and then:
- Again this is important, rename the action to “Apply to each – varAttachments”. If you don’t rename this step you’ll get errors later in the Flow.
- Set “Select an output from previous steps” to “Body” from “Get attachments”.
- Add a SharePoint action “Get attachment content” and:
- Set the action to your site and list name.
- Set “Id” to “ID” from “When an item is created”.
- Set “File Identifier” to “Id” from “Get attachments”.
- Add a Variable action “Append to array variables” and:
- Set “Name” to “varAttachments”.
- Set “Value” to:
{
"Content": @{body('Get_attachment_content_-Safety_Issue(attachment_content)')['$content']},
"Name": @{items('Apply_to_each_-_varAttachments')?['DisplayName']}
}

Add a SharePoint “Get items” step outside of the previous “Apply to each – varAttachments” step and then:
- Set the action to your site and list name.
- Expand “Show advanced options”.
- Set “Filter query” to “Title eq ‘Admin‘“. Note the single quotes around Admin.

This next step is complicated and will look like a bit of a sea creature when complete. Add a new step using the Control “Apply to each” action and then:
- Set “Select an output from previous steps’ to “value” from “Get attachments – Safety Issue (attachment name)”.
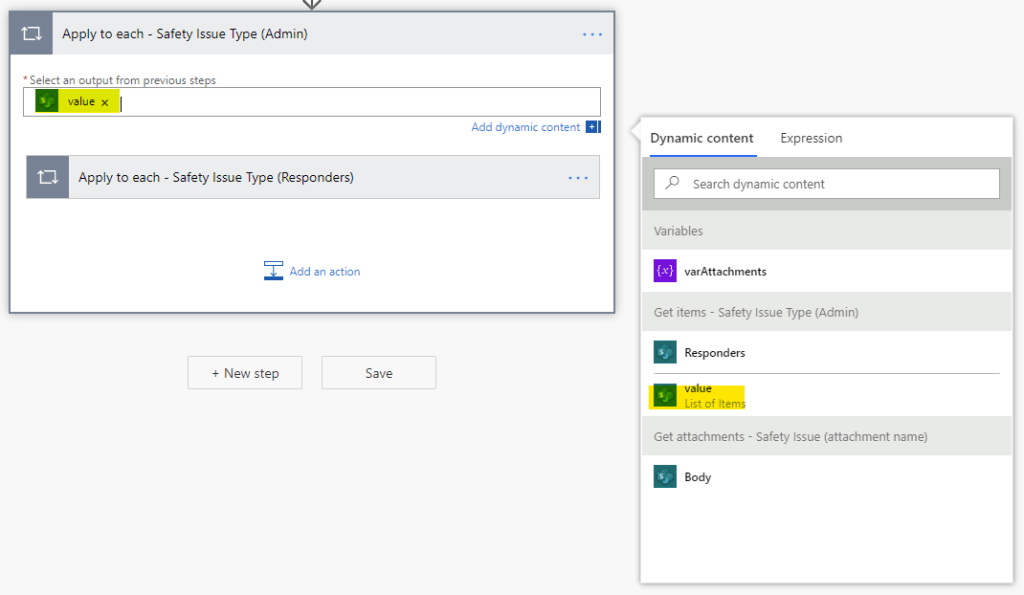
Add another Control “Apply to each” action and then:
- Set “Select an output from previous steps’ to “Responders” from “Get items – Safety Issue Type (Admin)”.
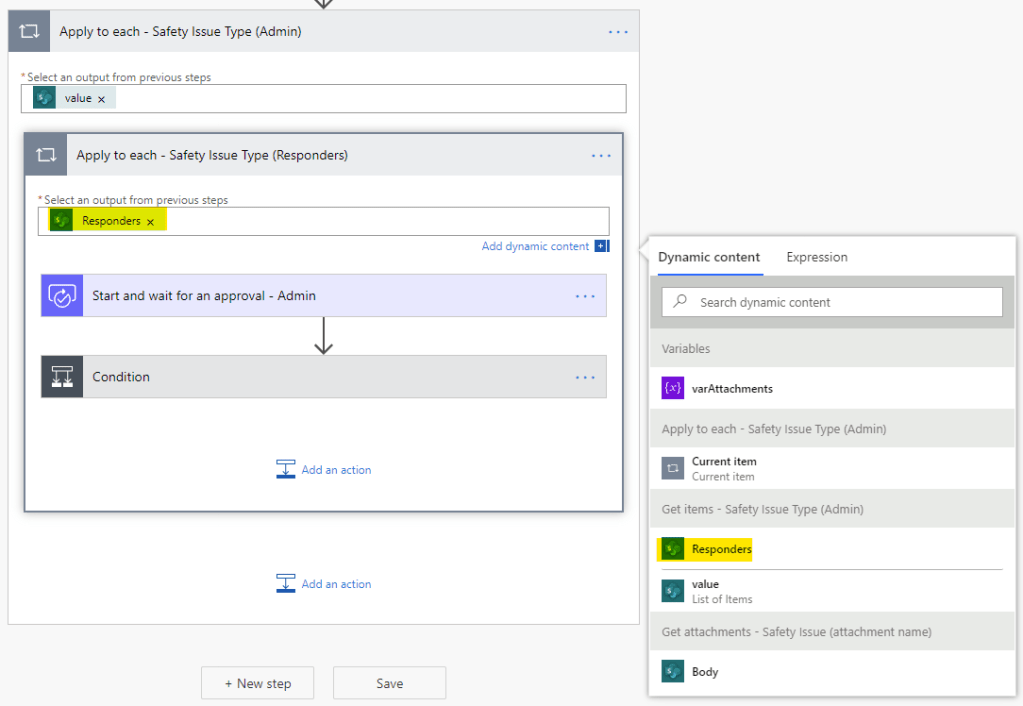
- Add a Approval “Custom Responses – Wait for one response” action and then:
- Set “Approval type” to “Approve/Reject – First to respond”.
- Add the following response option items: “Fire”, “Mold”, “Trip”, “Sharp” and “Rejected”. Side note, I’m not a big fan of “hard-coding” these options and would prefer something dynamic but I don’t believe it is possible with the out-of-box approvals.
- Set “Title” to “New safety issue – ” with dynamic content “Date Logged” from “When an item is created – Safety Issue”.
- Set “Assigned to” to “Responders Email” from “Get items – Safety Issue Type (Admin)”.
- Set “Details” to “Logged by: ” with dynamic content “Logged By Display Name” from “When an item is created – Safety Issue”.
- Set “Item link description” to “Link to item” from “When an item is created – Safety Issue”.
- Set “Item link description” to “New safety issue”.
- Set “Attachments” (under advanced options, switch to simple input) to “varAttachment”.

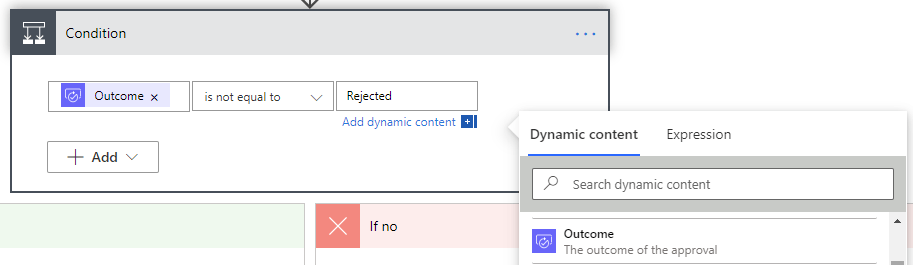
- Add a “Condition” action and then:
- Set the filter condition to “Outcome” from “Start and wait for an approval – Admin”, “is not equal to”, “Rejected”.
- In the “If yes” condition branch add a “Condition” action and then:
- Set the filter condition to “Outcome” from “Start and wait for an approval – Admin”, “is equal to”, “Fire”.
- In the “If yes” condition branch add a SharePoint “Update item” item and then:
- Set the action to your site and list name.
- Set “Id” to “ID” from “When an item is created – Safety Issue”.
- Set “Status Value” to “In-progress”.
- Set “Issue Type Id” to “Fire hazard”.
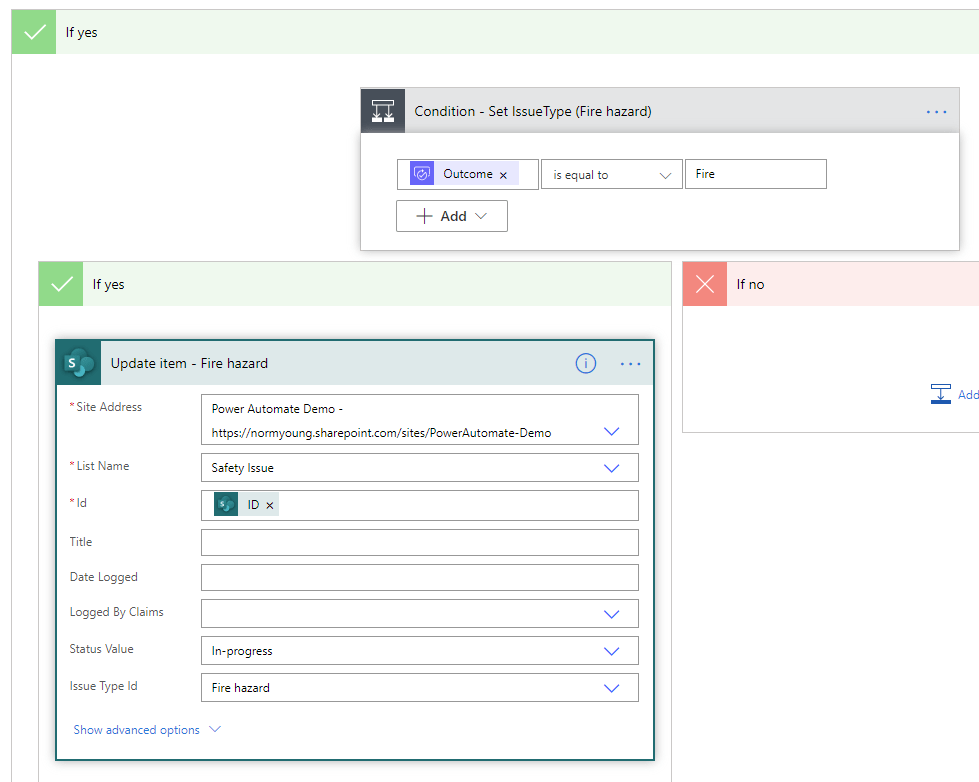
- Repeat the previous “Condition” – Fire steps for “Mold”, “Trip” and “Sharp”.
- Set the filter condition to “Outcome” from “Start and wait for an approval – Admin”, “is equal to”, “Fire”.

- In the “If no” condition branch add a SharePoint “Update item” item and then:
- Set the action to your site and list name.
- Set “Id” to “ID” from “When an item is created – Safety Issue”.
- Set “Status Value” to “Rejected”.

Save your Flow and test by running our Power Automate button from “Log safety issue – Part 2”. This in turn will trigger the “Safety issue response” Flow.
If all goes well the “Admin” will receive a message similar to the following:

The Approval message is actionable and allows the “Admin” to approve-categorize or deny the safety issue for further remediation within a single message. The image attachment provides context making for a more informed initial assessment by the safety issue admin.
In our next blog entry we will add Power Automate and SharePoint functionality to start and track the repair process.
Thanks for reading.
NY

Great post Norm. Glad I found your blog.
LikeLiked by 1 person