I’ve created enough Power Automate routines to know that they all eventually fail for some reason or other and it’s important to add resiliency to your production Flows where you can. This can include:
- Using service-accounts for your connections. This removes the impact of account actions like password changes or user deactivations.
- Adding co-owners to the Flow. This increases the options for support and continuity if the primary owner is not available.
- Handling errors whenever possible. This allows for known issues with the data, actions and other conditions that are acceptable within the business process that can be predictably dealt with in the Flow.
All of my production Flows include steps that will catch errors and let me know that there was a problem. The out-of-the-box Power Automate failure notification emails lack detail and are not real-time enough for my production routines. There are many ways of handling errors in Power Automate and, in this post, I will share how I do it for my own Flows using Scope actions and Microsoft Teams Adaptive Cards.
Scope: Encapsulate a block of actions and inherit the last terminal status (Succeeded, Failed, Cancelled) of actions inside.
At a high-level our Flow pattern will try to run the primary actions that make up the workflow. If there are errors, catch them and take follow up actions for known issues. If there are still issues it can run a final set of fail-safe actions. This type of exception handling is known as Try-Catch-Finally.
In Power Automate we will use Scope actions as containers for the Try, Catch and Finally blocks of work. In addition, our Flow will capture any debug information using a string variable that will be used for our Adaptive Card notification.
My typical Flow looks like the image below.

Part 1 – Add debug variable.
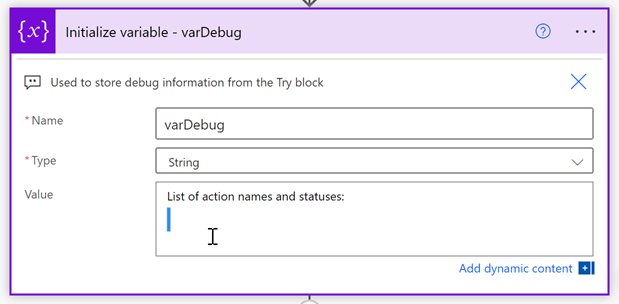
Add an Initialize variable action and set:
- Name to “varDebug”.
- Type to “String”.
- Value to “List of action names and statuses:
“.
The added line spacing is intentional and makes the debug information more readable within the Adaptive Card.
Part 2 – Add Try block.
Add a Scope action, rename it to “Scope – Try” and place all the primary workflow actions within the Try block. This name is used in later actions, so precision is important.

Part 3 – Add Catch block.
Add another Scope action, rename it to “Scope – Catch” and then:
- Click Menu for Scope – Try. Hint: the ellipse button.
- Select Configure run after.
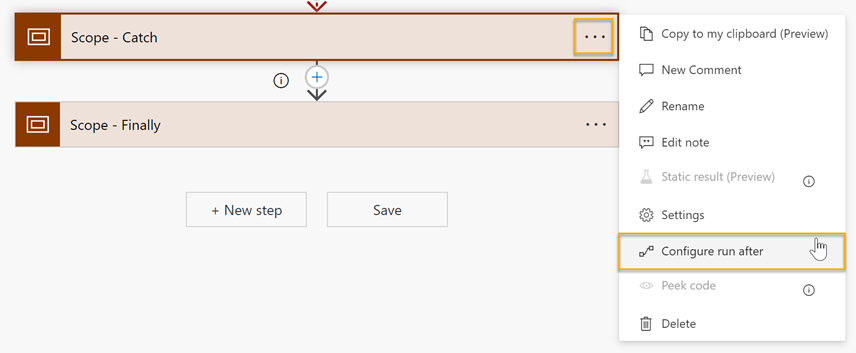
- Set Scope – Try to “has failed” and then click Done.
This setting ensures that the Catch block only runs if the anything in the Try block has failed. Notice that the arrow between the Try and Catch Scope actions is now red showing that it only runs on error.

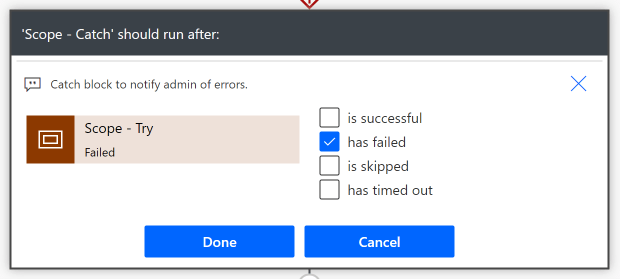
Within Scope – Catch, add an Apply to each action and set:
- Select an output from previous steps to the following expression:
result('Scope_-_Try')
Add an Append to string variable action and set:
- Name to “varDebug”.
- Value to: “
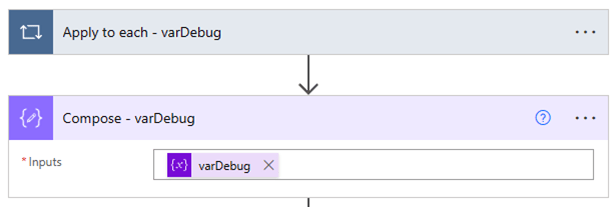
– Action Name: @{items(‘Apply_to_each_-_varDebug’)?[‘name’]}
– Action Status: @{items(‘Apply_to_each_-_varDebug’)?[‘status’]}
“.
Add a Compose action, to the Apply to each loop, rename it to “Compose – varDebug” and set Inputs to “varDebug”. This name is used in later actions, so precision is important.
Add a Post adaptive card in a chat or channel action and set:
- Post as to “Flow bot”.
- Post in to “Chat with Flow bot”.
- Recipient to your Flow owner. In my sample Flow the owner is included in an object variable definition, hence the “variable(…)” reference in the sample image. For my production Flows I store owner info in a table and is queried for at run time.
- Adaptive Card to JSON code listed in this text file.

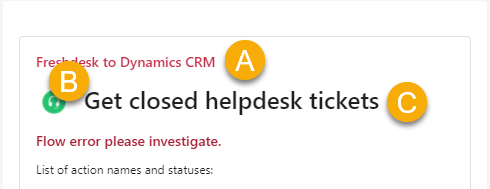
- Customize the following lines of code in the Adaptive Card to meet your needs:
- A) Title “text”: “Freshdesk to Dynamics CRM”
- B) Image “url”: “https://www.bing.com/th?id=OIP.bPJoIyVahbW0yWZQm4hfQwHaHa”
- C) Flow name “text”: “@{variables(‘varParameters’)[‘varFlowName’]}”
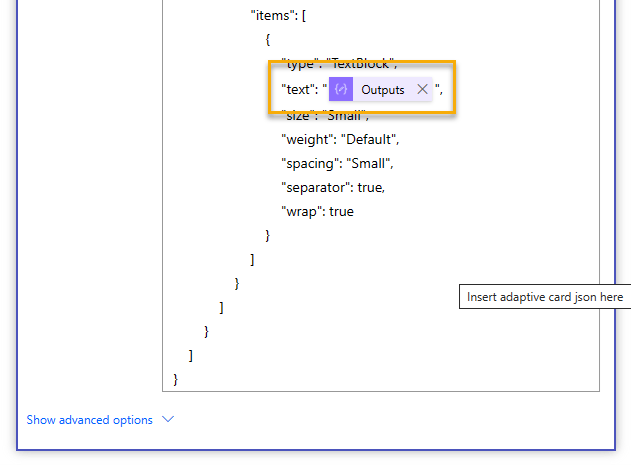
Ensure that Outputs from the Compose – varDebug action display exactly as shown below. This is the captured debug information from an error.
My completed Scope – Catch block looks like the image below.

Any errors in the Try block are captured in the Apply to each loop, formatted into a single string using the Compose action and then sent to the Flow owner using the Adaptive Card. In the sample image below I get a breakdown of the Flow steps, statuses and quickly see where the failure occurred.

For my production Flows that are related to Microsoft Lists or Dataverse data I include an action button that links to the specific item / record on the Adaptive Card.
Part 4 – Add Finally block.
Add another Scope action, rename it to “Scope – Finally” and then:
- Click Menu for Scope – Try. Hint: the ellipse button.
- Select Configure run after.

- Select all options in Scope – Finally and then click Done.

This setting ensures that the Finally block always runs regardless of any failures in the Try and Catch blocks. The Finally block is ideally suited for central logging activities outside of the core business process that the Flow is supporting.
My completed Flow looks like the image below. Making a Flow fail can be tricky, so to test consider updating a code based actions like Parse JSON or Post adaptive card in a chat or channel in Try block with an expected character to force an error.

All things with technology eventually fail. Using a Try-Catch-Finally approach to exception handling in Power Automate will help to add resiliency to your production Flows.
Thanks for reading!
NY

Thanks, this is a good walkthrough. I’m particularly impressed with the use of the result() function to do a kind of traceback! I’ve posted it to my Power Platform Users group on Yammer and I’ll have a go putting it into practice on my next project…
LikeLike
Thanks for the feedback Christopher!
NY
LikeLike
Hey Norm,
I sat in on your Power Platform conference presentation, great job!
I really like your idea of using a base parameter object, but how do you account for appending to child array variables? The built in append function does not work for children arrays and using the addproperty function removes the ability to use concurrent iteration(to the best of my knowledge at least).
LikeLike
Hi Bruno!
Thanks for attending and for those kind words, I really appreciate it! The Debug variable is only intended to store output from the Scope – Try block. I like that it shows the sequence of completed actions to the point of failure. If you wanted to keep that functionality I would consider additional Debug variables. If you don’t need that functionality and just want to trap on any error you should be able to repurpose the variables across Scope actions using append and not set.
I haven’t tried that but can see benefit to the approach.
Thanks again!
NY
LikeLike